To add to our selection of payment methods, we now offer Stripe as an option.
To set this up go to Website tab, Payment Methods, ADD, select Stripe. Then fill in these fields:
Once set up, under Reservation Details, Payments, all of these options will be available:
Friday, June 14, 2019
Tuesday, April 2, 2019
NEW: Use merge codes to add website messages to email templates
It is now possible to use a merge code for a website message in order to add the message text to an email template. This could be useful for a situation where your cancellation policy on your reservation page is the same policy you want to include in an email template.
At the bottom of the Website Message edit page is where the code for each message is located.
Copy that code into an email template, and when the email is generated the code will be replaced with the text of the website message.
At the bottom of the Website Message edit page is where the code for each message is located.
Copy that code into an email template, and when the email is generated the code will be replaced with the text of the website message.
Friday, February 1, 2019
New Connection: Quickbooks Online - feeback/testing requested
We have completed the first step in building a connection with Quickbooks and are looking for some users to help with testing it, and for ideas on how to make it better.
If you have a Quickbooks Online account then you can help with testing (other versions of Quickbooks we will work on in the future).
To link your account, go to Settings, External Connections, add, QuickBooks. Once this is done, you can then use a new section in the Payments by Date report to manually send over payment details to your QB account.
Also, here is a short video explaining what we have so far:
How to export to Quickbooks Online.
https://v2.reservationkey.com/p/faq/?s=1070&v=s27
If you can use this connection, please let us know:
- if it worked
- enhancements or improvements you would like to see
Potential future enhancements:
- create invoices
- link payments to invoices
- send customers as part of the payment receipt (or invoice)
- send refunds as a "refund receipt"
- maybe have the information transmit to QB automatically in real time whenever a payment or refund is entered into the system
- possibly be able to select which account in QB the payments should be linked to
- maybe have ReservationKey automatically set up new accounts (such as ReservationKey Sales and ReservationKey Refunds) and also set up new services which we can link the payments to
Monday, December 3, 2018
What steps should I take prior to "going live" with my new ReservationKey account?
The switch over is really very simple. Go through this checklist to make sure you are ready to make the switch to your new ReservationKey account:
1. Create a ReservationKey account.
When you sign up for a trial account, you a getting access to our full system, the exact same system, log in, etc that you will use once you go live. You can configure the ReservationKey just the way that you like it prior to cutting over.
2. Set up Rooms, Rates, Fees, Taxes, Discounts, etc.
Make sure that you have all of your rooms, rates, photos, descriptions, etc in place. This is the first step to setting up a new account
3. Set up a Payment Method.
Decide how you want to take payments through ReservationKey. If you are taking Credit Cards, make sure that you have set up your credit card processor in the system and that you’ve activated your account with them. Here is a link to our FAQ on Payments
4. Do you need to use our Channel Manager?
If you are looking to have your rooms/properties published out to OTAs such as booking.com and Expedia, you’ll need to make sure that you have MyAllocator set up both in ReservationKey and in MyAllocator.com. Here is the FAQ for this and once you have the connection in place here is a video to help guide you through setting up your rooms
5. Emails.
Spend some time with the automated emails in the system as this will make your life much easier to have these formatted and sent out automatically.
6. Select a theme.
Customize your theme so that your booking pages match the look of your website. We have several to choose from.
7. Make test reservations - Public Booking Page.
The best way to test is to make your own reservations. From the Website tab in ReservationKey, select Reservation Pages. Here you will see both Availability and Calendar previews of your booking pages. You can click on these links to see your booking pages. These are the exact same booking pages that your customers will see when they come to your website to make a reservation. From here you should make a reservation for yourself. This way you will see if the process works correctly. Check your emails, check yourself in to the room, check out, etc. Is everything working the way that you would like for your guests? If so, you are ready to go!
8. Add your existing reservations.
If you have less than 50 upcoming reservations it is fastest if you just manually add them to the system. Otherwise, email us (support@reservationkey.com) a file containing your reservations and we will import them for you (the file can contain historical data as well as future reservations). Please format the file prior as explained here to sending it to us.
9. Point your website to ReservationKey.
Right now you have links on your website that point to your current booking pages. These may be in a few places, including on each rooms page. For each of these links, they will need to now be pointed to the booking pages hosted by ReservationKey. You can do this change yourself or your web developers can do it for you. Generally you would make a copy of each of your current pages with the new links and save them as Drafts. This way you can view the page and test it out. Once you are comfortable that the page is working correctly, you can publish the new page. Once this is done, you are now live on ReservationKey. Your update will be completed in a matter of seconds and no one will ever know you made any changes.
Tuesday, October 30, 2018
Answer to commonly asked questions from clients coming from Webervations and Rezovations
1. Can I set the system so that it is an inquiry only?Yes! By changing the system to not block the dates until the reservation is confirmed, this is easy to do. Also add text in the reservation page header and confirmation page to make it clear to guests that you will review their reservation and get back to them with 24 hours. Then when changing the status to "Confirmed" the system will block the dates in the calendar, and optionally can automatically send a confirmation email to the guest at the same time.
2. Does the system support Yapstone as a payment processor?
Yes! We have worked for many years with Yapstone and it is easy to set up the connection between ReservationKey and Yapstone. We like Yapstone so much that in fact we use them to handle all of our subscriber's credit card payments for our services.
3. Can we import our data from Webervations or Rezovations into ReservationKey?
Yes! This is just a matter of creating a CSV export file and emailing it to us - support@reservationkey.com. We can load your data into our system within a day or two of receiving your file. We ask that you format your export file as we explain in our import guide.
4. Does the system notify us of new reservations?
Yes! We send an automatic email notification to you every time you receive a new reservation. We also have a place in the system which prominently shows "X new" meaning, the number of new reservations you receive in the last two days.
5. Is it easy to add the ReservationKey booking engine to my website in place of Webervations or Rezovations?
Yes! This is just a matter of changing the link on your "Book now" or similar button to point to your new ReservationKey booking page.
6. Are your prices reasonable?
Yes! We certainly think so. While we have a powerful and full featured product, we strive to keep our prices affordable for even the smallest of properties. Check for yourself - click here for our price list.
7. Can we connect to channels like booking.com, Expedia, VRBO, and Airbnb?
Yes! These are all easily connected to using our Channel Manager, myallocator.com. If you need only Airbnb and VRBO then it is possible to use iCal links (free, easy to set up).
Friday, October 19, 2018
NEW OPTION: Create a fee that is a percentage of the room price
We now have an option to set up a fee that is calculated as a pecentage of the total room price.
All the fees:
An example showing one of each fee type added to a reservation:
All the fees:
An example showing one of each fee type added to a reservation:
Wednesday, October 17, 2018
IDEA: Creative placement of booking engine
Here is a really neat idea, embedding the entire booking page is a small box on your homepage. This way guests can book directly from the front page, without needing to search for the booking system.
This example shows the embedded box appears only on large screens. On smaller screens it disappears, but guests can still find the reservation system through the normal navigation menu.
Watch this video to see how this works.
Calendar Search Mode
Availability Search Mode
This example shows the embedded box appears only on large screens. On smaller screens it disappears, but guests can still find the reservation system through the normal navigation menu.
Watch this video to see how this works.
Calendar Search Mode
Availability Search Mode
Tuesday, October 16, 2018
Six New Reservation Page Themes
We have just released six new themes for our reservation pages. These themes use modern design principles, are responsive, and generally go a long way towards improving the look and feel of the system. If you are using one of our older themes we highly recommend you consider switching to one of these new themes.
Watch this video for a preview of all the themes.
Also, we can help with customization of the themes, or any other questions you may have.
Older themes have been retired, and no longer appear in our list of themes for newer users.
Dark Grey
Forest Green
Beach Blue
Red Sunrise
Violet
White
Watch this video for a preview of all the themes.
Also, we can help with customization of the themes, or any other questions you may have.
Older themes have been retired, and no longer appear in our list of themes for newer users.
Dark Grey
Forest Green
Beach Blue
Red Sunrise
Violet
White
Thursday, October 11, 2018
NEW: Select what payment category to use for initial online payments.
One of our users noticed that payments coming from a reservation page are not categorized like payments that are entered internally. So we have now added an option to set what category should be used for the initial payment from the online payment page. This setting is found under the Website tab, Payment Schedules. Whatever is set here will now be used as the payment category for the initial payment. Remember, you can set up your own Payment Categories under Settings, Lists.
Thursday, September 20, 2018
HOW TO CONVERT A TELEPHONE OR EMAIL INQUIRY INTO A BOOKING
One of our property manager users describes below how she is able to convert leads to booking using ReservationKey's payment link feature. This automates the process of asking the guest for a credit card and at the same time gives them a quote to review.
Summary:
1. Get the potential guest's email address
2. Make a placeholder reservation for the dates they are interested in using a status that doesn't block the calendar
3. Send them a payment link from the placeholder reservation
4. Sit back and watch for the guest to submit their payment details
This works great for us.
All you have to do is get the potential guest's email address during call or from their email inquiry and send them a quote with this link in your quote: {{paymentlink_balance}}.
This way, if they decide to book the space, they can submit their info ANY TIME OF DAY (including credit card info) and as long as it is available (we set Quotes to INQUIRY STATUS so they are not in the calendar and Holds as 24 Holds in the calendar), we are sent a notification that a credit card has been submitted and it throws them in the calendar if the space is still available and changes the status (we use PAYMENT METHOD ADDED). We then go in a confirm the space with their card.
It has worked for us, time and time again.
When they click on the {{paymentlink_balance}} link, they see the quote info, a credit card form and our headline at top that reads like this:
"READY TO BOOK? Fill out all info including credit card information. Payment WILL NOT be automatically run when you submit info.
When you successfully submit this form, our office will be notified that you wish to confirm a certain reservation request or change the credit card on file for a confirmed booking. If you are submitting this info to confirm a hold, please be advised that the confirmation is based on availability only. The credit card will not be automatically run. If available, submitting this form will also reinstate an inquiry to a hold (if still available) by blocking the dates and alerting us to your request. Thank you for using this secure payment request method."
Folks, this really works for us and John just added the phone number to the form so all the call in needs to give us is their email and this form collects every thing else you need when they decide to book no matter the time of day... It also works when more than one credit card is used or other party members pay their portion.
Monday, August 20, 2018
NEW FEATURE: Set user permissions from within the room/unit settings
For our users with many room/units and many users, it is now a lot easier to manage permissions when adding a new unit to your account. Previously it was necessary to open the settings for every user and add the newly added unit to their permissions.
Now, from within the Room/Unit settings screen it is just a matter of selecting which user(s) have access to the unit. This new feature is in addition to also being able to edit user permissions in the Settings tab, Users. That section remains as it has been.
Wednesday, May 23, 2018
NEW: custom fields numbers drop down
A new type of custom field has been added - numbers. An easy way to make a dropdown list that contains incrementing numbers. Just enter the start, stop, and optional increment to build this type of custom field.
A custom field of this type can be added in the Website tab, Custom Fields, ADD.
Thursday, April 12, 2018
NEW FEATURE: Multiple Rate Plans Per Room/Unit
It is now possible for guests to select from multiple rate plan options when making reservations online using the date search view in either the multiple rooms or hotel style booking pages. This is useful to be able to offer different rates for the same room, depending on amenities offered (such as with or without breakfast). Another use is to be able to offer packages that are part of the room.
Some examples:
Multiple units page:
Hotel style page:
Example showing price reduced with a rate adjustment, and another rate plan where the minimum stay hasn't been met.
How to set this up?
1. Add all your various rate plans. Be sure to add a plan title and description for each.
2. Select your rate plans.
If using multiple unit pages select the plans in the Room/Unit settings.
If using hotel style pages select your plans in the Room Type section.
The selected rate plan will show in the summary, the confirmation message, and also internally. We plan to add more functionality to this feature in the future, such as being able to select a rate plan internally as well.
Some examples:
Multiple units page:
Hotel style page:
Example showing price reduced with a rate adjustment, and another rate plan where the minimum stay hasn't been met.
How to set this up?
1. Add all your various rate plans. Be sure to add a plan title and description for each.
2. Select your rate plans.
If using multiple unit pages select the plans in the Room/Unit settings.
If using hotel style pages select your plans in the Room Type section.
The selected rate plan will show in the summary, the confirmation message, and also internally. We plan to add more functionality to this feature in the future, such as being able to select a rate plan internally as well.
Saturday, March 24, 2018
NEW FEATURE: Daily Activity by clicking date bar
Now it is super easy to get an overview of your activity for the day. Simply click the date bar and a summary of arrivals, staying, and empty rooms will show. This also shows outstanding balance, number of guests, and number of nights.
Friday, March 9, 2018
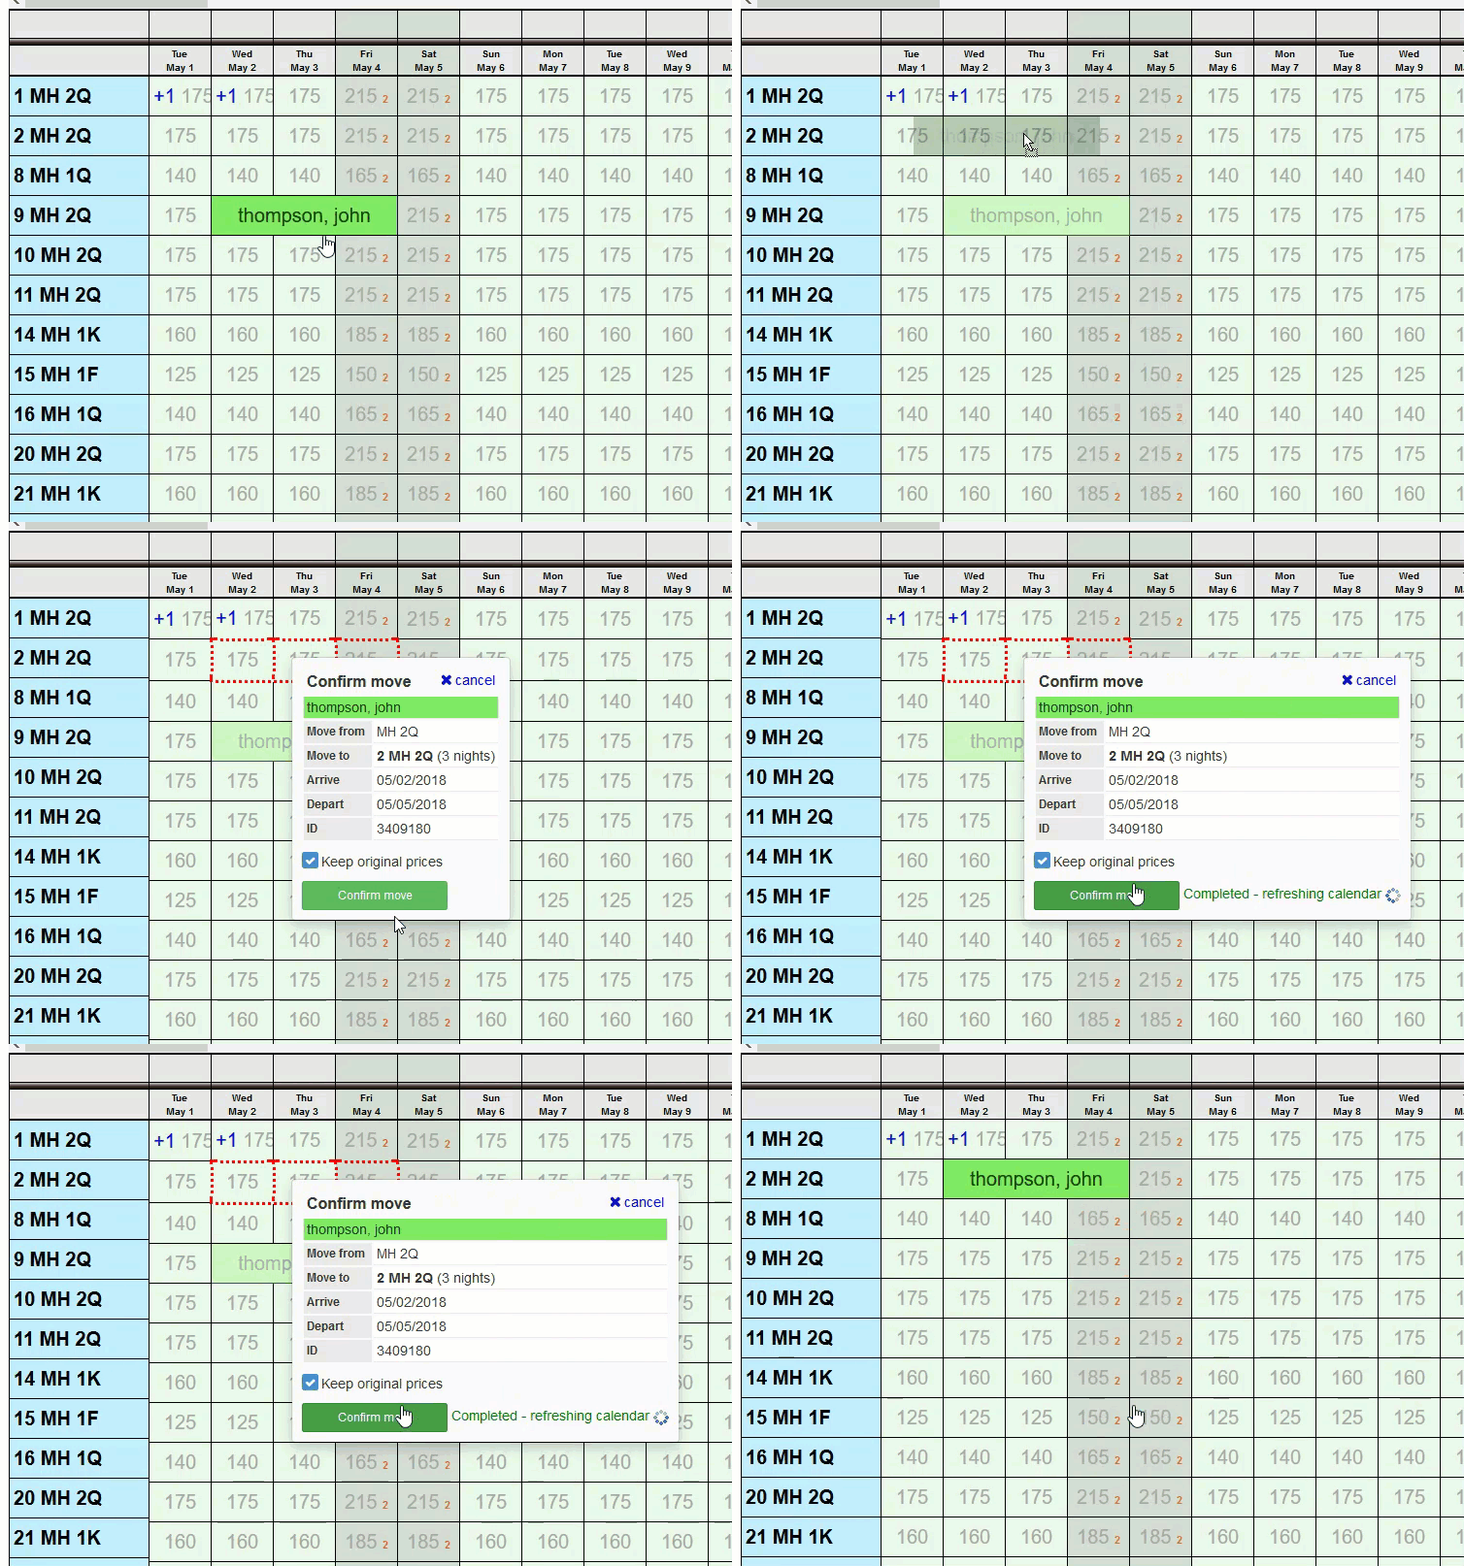
New: Drag and drop reservations
It is now easy to move reservations around on the calendar - just drag, drop, and confirm. There is also the option to keep the original prices, or to pull prices fresh from the room the reservation was dragged to.
Monday, December 11, 2017
Updated Correspondence Window
We have improved the look and feel of the correspondence window so that it is now more mobile friendly and also cleaner.
Some of the key changes:
- The editor toolbars are hidden by default
- Cc, Bcc, Reply-To, Attachments are hidden unless the field contains data or the link to show is clicked
- Much more useable now on small devices
- The correspondence history section also works better on small devices
Some of the key changes:
- The editor toolbars are hidden by default
- Cc, Bcc, Reply-To, Attachments are hidden unless the field contains data or the link to show is clicked
- Much more useable now on small devices
- The correspondence history section also works better on small devices
Thursday, October 12, 2017
NEW ENHANCEMENT: Easily view your ADR and RevPar
ADR and RevPar, two important financial performance indicators used in the hotel industry, are now easily found in the report Income Summarized by Unit.
Average Daily Rate, ADR, is one of the commonly used financial indicators in hotel industry used to measure how well a hotel performs compared to its competitors and itself (year over year). It is common in the hotel industry for the ADR to gradually increase year over year bringing in more revenue. However, ADR itself is not enough to measure the performance of the hotel. One should combine ADR, occupancy and RevPAR (revenue per available room) to make a sound judgment on hotel performance. Wikipedia
Revenue Per Available Room, RevPAR, is a performance metric in the hotel industry that is calculated by dividing a hotel's total guestroom revenue by the room count and the number of days in the period being measured.Wikipedia
Friday, October 6, 2017
NEW FEATURE: Click to call
Phone numbers entered into the Reservation Details are now clickable to call. Skype or another phone program can open, depending on your what you have set in your browser. Or on a mobile device, your device's phone.
Once a number is typed into one of the phone fields, the new call link shows. Just click the link to make a phone call.
Here is a video showing how this works:
Once a number is typed into one of the phone fields, the new call link shows. Just click the link to make a phone call.
Here is a video showing how this works:
Thursday, October 5, 2017
NEW FEATURE: Change the order of guest names
It is now possible to change the order of the guest names on the internal availability calendar to read first name first, such as John Smith" instead of the default last name first, such as "Smith, John."
To set this up, go to Settings, Preferences and expand the section for "Internal availability calendar." Then select how you want guest names displayed, and remember to click Save.
Also, here is a quick video showing this setting.
To set this up, go to Settings, Preferences and expand the section for "Internal availability calendar." Then select how you want guest names displayed, and remember to click Save.
Also, here is a quick video showing this setting.
NEW FEATURE: send email automatically when changing reservation status
Have you ever wanted to be able to have ReservationKey send an email automatically after you've changed the reservation status? This is now possible.
To set this up, go to the Website Tab, Email Templates, and select a template. Then expand the Advanced section and select the status where the email will be sent. Once this is saved, whenever changing to this status in the Reservation Details page, the email will be sent.
Also, watch our video walk-through of this feature for more details.
Thursday, September 28, 2017
NEW: Reports menu has been redesigned
Something we meant to do for awhile, and now have completed, was to improve how the Reports menu works. Instead of one long column listing all our reports, we have now sorted them into topic areas which we makes it easier to find the report you are looking for.
For users that only see some of the reports, we still sort into topics, but just show the reports select, and still in the order specified by the user.
For example:
For users that only see some of the reports, we still sort into topics, but just show the reports select, and still in the order specified by the user.
For example:
Tuesday, September 26, 2017
NEW FEATURE: Track when emails were opened
It is now possible to see when exactly an email sent from ReservationKey was opened. We automatically add tracking now to all emails sent from the system. When the email is opened ReservationKey records the time and location where it was opened. This is useful to verify that guess are receiving your emails and when they opened the message.
An easy way to see a list of all emails opened on a particular day is to use the Monthly/Yearly Statistics report and select "Reservation Emails Opened." Then click the link next to each date to expand that day's results.
We also have added the tracking information to the "Reservation Emails Sent/Scheduled" view in this same report.
Clicking into a reservation, now in the Correspondence button we see a summary of emails.
And in the Correspondence History & Queue we have a new column showing how many times each email sent was opened.
We have also created a video walk through of this new feature here:
https://www.youtube.com/embed/qTSmJT3xXCw
Tuesday, September 19, 2017
NEW FEATURE: Set rates & minimum stay day by day in Rate Plans
In additional to our existing way of setting rates, by entering rates for each date of the week, it is now possible to enter rates on a day by day basis. This makes it easy to quickly change rates and minimum stays for specific dates.
We used to recommend using Rate Adjustments for making small changes, but now that section may no longer by needed. Instead just make a rule, for example, for one year, and then enter all your rates and minimum stays directly in each day of every month.
To use this new feature, go to the Properties tab, Rate Plans, Add a New plan or click into an existing plan. Then either Add Rule, or click an existing Rule to edit it.
Enter a start and end date (maximum range for day by day feature is three years worth of dates).
Finally, enter rates and minimum stays. Rates go in the first box, minimum stay in the second, for each date. Use the links at the bottom of each calendar to make entering rates quicker. There are also similar links at the top of the page for duplicating rates throughout all dates (rather than one month at a time).
Also take a look at our video walk through of this new feature:
Subscribe to:
Posts (Atom)