For properties where guests book by the room TYPE rather than the specific unit, ReservationKey configuration just got a lot easier. Now, instead of duplicating room descriptions and photos in every identical room, you just have to enter the room descriptions and photos, once, in the Room Types section. The latest blog post goes into more detail on how to set up one of these type of properties.
http://reservationkey.blogspot.com/2012/10/configuring-reservationkey-for-hotels.html
News and information about our reservation software. An online web-based solution that works great for bed & breakfasts, property managers, hotels, rental businesses, and lots more.
Wednesday, October 31, 2012
Configuring ReservationKey for Hotels, Motels, Campgrounds
ReservationKey works well for larger properties such as hotels, motels, and campgrounds, where users book by the TYPE of unit. Here are the steps for how to set up this type of property. All of these sections are located under the Properties Tab.
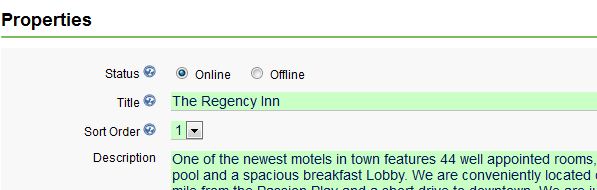
1. Properties / Locations
- Add your property name
- Add descriptions and photos as desired
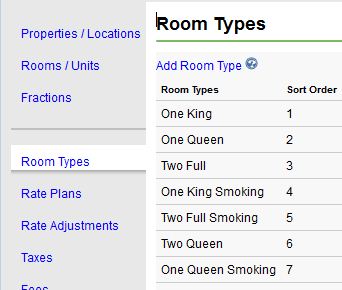
2. Add Room Types
- Create a type for every style unit you have (use generic names such as King, Queen, Double, etc.)
- Add descriptions and photos for each of the room types
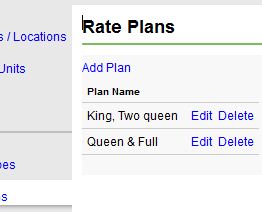
3. Create Rate Plans
- Set up a new Rate Plan for every type of room that has different prices.
- If you have four different room types and each type has different prices, then you will need four rate plans. If you charge the same rates no matter which room type is selected, then you would only need one Rate Plan.
- Inside each Rate plan add Rate Rules to cover your different price breaks (such as low season, high season, etc.)
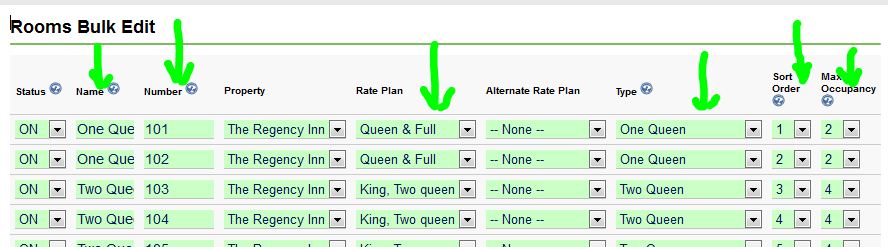
4. Add Rooms
- The easiest way is to use the Bulk Add feature.
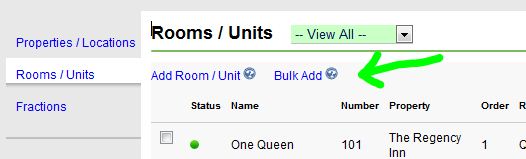
- For room names, keep it generic and make sure it matches exactly what you have set up the names in Room Types. If you have 40 rooms, split between 10 rooms of each type, you would enter the same name 10 times for each type.
- Use the Room Number field for your numbering of the rooms, such as the number that is posted on the door of each room. This number will not appear on the external Reservation Page.
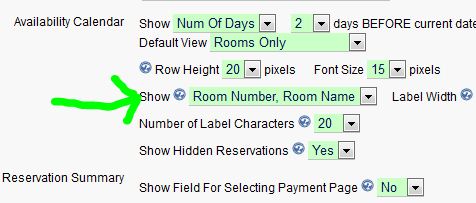
In the Preferences section (Settings Tab) you can set what to show on the internal calendar (room names, numbers, or both).
- From the drop down menus select the correct room type (to match the room name you entered), Rate Plan, and set the Maximum Occupancy. The other settings are not optional so ignore those for now.
- Because you added your descriptions and photos to the Room Types section, you do NOT need to edit each unit and add photos and descriptions. However, if you hadn't set this information in Room Types, then the system would pull descriptions/photos from the rooms settings.
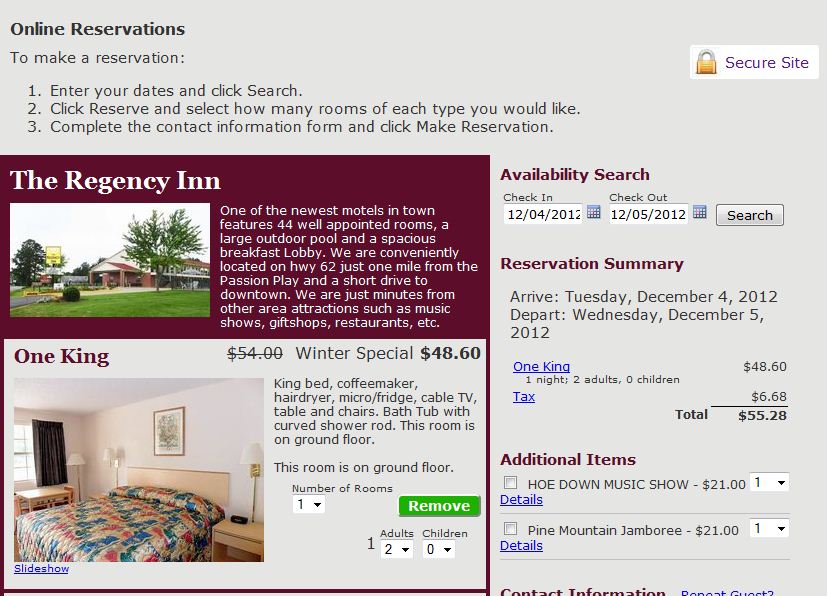
The final step is to set up your Reservation Page, which is under the Website Tab. Go there, and click Add Page. Select Hotel as the type. There are a lot of settings on this page, so go through each section carefully. At the bottom, make sure to select all of your rooms that you want to make available for booking.
1. Properties / Locations
- Add your property name
- Add descriptions and photos as desired
2. Add Room Types
- Create a type for every style unit you have (use generic names such as King, Queen, Double, etc.)
- Add descriptions and photos for each of the room types
3. Create Rate Plans
- Set up a new Rate Plan for every type of room that has different prices.
- If you have four different room types and each type has different prices, then you will need four rate plans. If you charge the same rates no matter which room type is selected, then you would only need one Rate Plan.
- Inside each Rate plan add Rate Rules to cover your different price breaks (such as low season, high season, etc.)
4. Add Rooms
- The easiest way is to use the Bulk Add feature.
- For room names, keep it generic and make sure it matches exactly what you have set up the names in Room Types. If you have 40 rooms, split between 10 rooms of each type, you would enter the same name 10 times for each type.
- Use the Room Number field for your numbering of the rooms, such as the number that is posted on the door of each room. This number will not appear on the external Reservation Page.
In the Preferences section (Settings Tab) you can set what to show on the internal calendar (room names, numbers, or both).
- From the drop down menus select the correct room type (to match the room name you entered), Rate Plan, and set the Maximum Occupancy. The other settings are not optional so ignore those for now.
- Because you added your descriptions and photos to the Room Types section, you do NOT need to edit each unit and add photos and descriptions. However, if you hadn't set this information in Room Types, then the system would pull descriptions/photos from the rooms settings.
The final step is to set up your Reservation Page, which is under the Website Tab. Go there, and click Add Page. Select Hotel as the type. There are a lot of settings on this page, so go through each section carefully. At the bottom, make sure to select all of your rooms that you want to make available for booking.
Thursday, October 25, 2012
New Feature: Scheduled Emails
We have developed functionality to automatically send emails to guests based on dates saved in custom fields. This is useful for sending automatic yearly emails to guests for events such as a birthday or wedding anniversary.
Here's how to set it up:
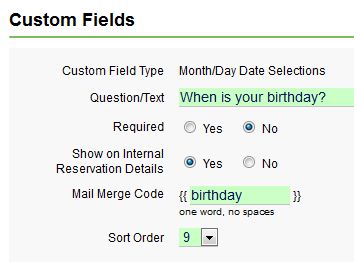
1. Add Custom Field(s)
Add one or more custom fields of the date type: Website Tab, Custom Fields, Add, Month/Day or Day/Month Date selections, Continue, enter your data, Save.
- enter the question that corresponds to the date you want to capture (ie. When is your birhday, anniversary, etc..)
- required - whether or not field will be required on a public Reservation Page
- show internal - whether or not to show it on the Reservation Details page, internally
- mail merge code - if you want to plug this data into email templates
If you want the custom fields to appear on your Reservation Page, make sure you go to your page settings (Website Tab, Reservation Pages, edit) and select the newly added field(s).
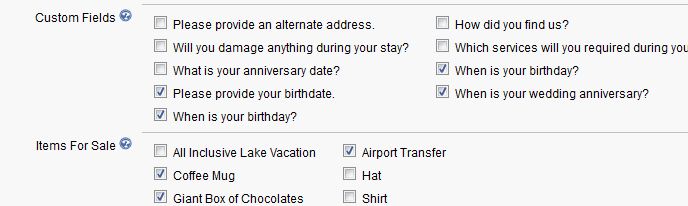
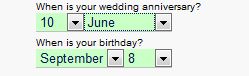
As you or your guests enter dates into these fields, they will be automatically added to list of people to receive an email (once scheduled).
2. Create Email Template(s)
Build a new template for each Scheduled Email you plan to send out (such as one for a birthday greeting and one for an anniversary greeting). Go to Website Tab, Email Templates, Add Template.
- attachments can be included; useful for doing something like "Attached is a coupon for 15% off all food in our restaurant."
- since Scheduled Emails are not linked to a particular reservation, most of the merge codes will not work. These are the codes that can be used:
{{guestfirstname}}
{{guestlastname}}
{{secondguestfirstname}}
{{secondguestlastname}}
{{guestsfirstnames}}
{{guestaddress}}
{{guestemail}}
{{guestphone}}
{{guestbusinessphone}}
{{guestmobilephone}}
{{guestcompany}}
3. Schedule the Email
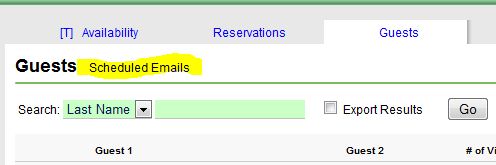
Go to Reservation Manager, Guests, and click the link "Scheduled Emails" in the header.
Click Add Scheduled Email.
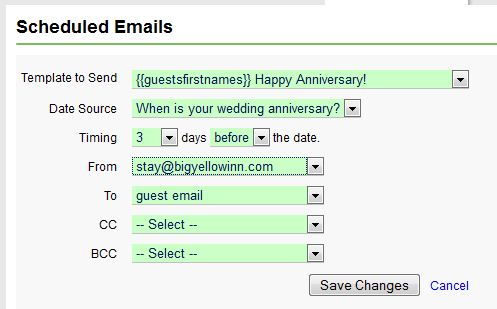
- select template - the email you want to go out
- select a date source - such as anniversary
- set the timing - when you want it to go out - before or after the date, or exactly on the date
- set a from and to emails (and cc and bcc if desired)
Click save, and now your email will be sent once a day, to any guests that match your timing criteria.
- Note, currently we only send emails yearly, based on the day and month of the date.
Once the schedule is set up, the list of Scheduled Emails shows how many are scheduled to go out yesterday, today, and tomorrow. If more than zero, the number will be a link, and it is possible to click on it and see a box listing all the individual recipients.

Here's how to set it up:
1. Add Custom Field(s)
Add one or more custom fields of the date type: Website Tab, Custom Fields, Add, Month/Day or Day/Month Date selections, Continue, enter your data, Save.
- enter the question that corresponds to the date you want to capture (ie. When is your birhday, anniversary, etc..)
- required - whether or not field will be required on a public Reservation Page
- show internal - whether or not to show it on the Reservation Details page, internally
- mail merge code - if you want to plug this data into email templates
If you want the custom fields to appear on your Reservation Page, make sure you go to your page settings (Website Tab, Reservation Pages, edit) and select the newly added field(s).
As you or your guests enter dates into these fields, they will be automatically added to list of people to receive an email (once scheduled).
2. Create Email Template(s)
Build a new template for each Scheduled Email you plan to send out (such as one for a birthday greeting and one for an anniversary greeting). Go to Website Tab, Email Templates, Add Template.
- attachments can be included; useful for doing something like "Attached is a coupon for 15% off all food in our restaurant."
- since Scheduled Emails are not linked to a particular reservation, most of the merge codes will not work. These are the codes that can be used:
{{guestfirstname}}
{{guestlastname}}
{{secondguestfirstname}}
{{secondguestlastname}}
{{guestsfirstnames}}
{{guestaddress}}
{{guestemail}}
{{guestphone}}
{{guestbusinessphone}}
{{guestmobilephone}}
{{guestcompany}}
3. Schedule the Email
Go to Reservation Manager, Guests, and click the link "Scheduled Emails" in the header.
Click Add Scheduled Email.
- select template - the email you want to go out
- select a date source - such as anniversary
- set the timing - when you want it to go out - before or after the date, or exactly on the date
- set a from and to emails (and cc and bcc if desired)
Click save, and now your email will be sent once a day, to any guests that match your timing criteria.
- Note, currently we only send emails yearly, based on the day and month of the date.
Once the schedule is set up, the list of Scheduled Emails shows how many are scheduled to go out yesterday, today, and tomorrow. If more than zero, the number will be a link, and it is possible to click on it and see a box listing all the individual recipients.
Sunday, October 21, 2012
Changing/Moving Reservations Now Much Easier
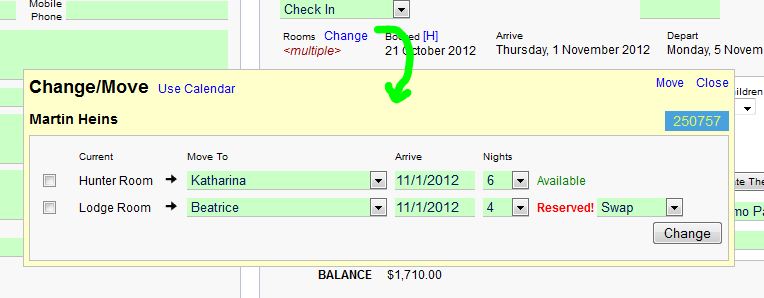
From the Reservation Details page, the Change link now opens a small window where quick adjustments to a reservation can be made.
This window contains several useful features.
1. Move Rooms
Simply select the new room to move this guest to. After selecting the room, the system will automatically check to see if the newly selected room is available. If not, as seen in the Lodge Room to Beatrice move in the above example, the system will show a warning, but give options for overriding the warning. The options are to Swap or Overwrite. Swapping the rooms will put the existing reservation in the old room, and the current reservation in the newly selected room. Overwriting will replace the existing reservation with the current reservation.
2. Change the Arrival Date and Number of Nights
Select a new arrival date by clicking in the Arrive box. Add or remove reserved nights by adjusting the number of nights drop down. Note, it is not possible to adjust the number of nights for non-consecutive stays. The entire non-consecutive stay block will be moved to the new arrival date. To change the number of nights, click the Use Calendar link.
3. Remove Room(s)
When a reservation contains more than one room, checkboxes appear to the left side of the window. Check the rooms to be removed, and then click the Remove button.
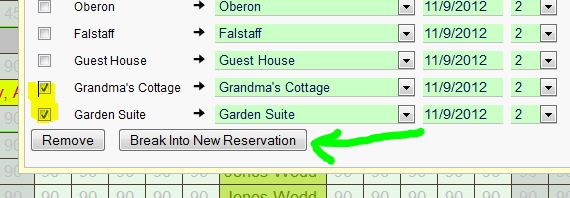
4. Break Out Room(s)
For multiple room reservations, it is possible to select which room(s) should be taken out of the existing reservation and used to create a new reservation. This is very useful for making new reservations out of a block of rooms being held for a group, such as for a wedding. Simply select the room(s) which will form the new reservation, and click the button Break Into New Reservation.
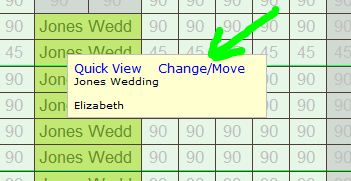
It is also possible to change rooms from the Availability calendar. Hover over a reservation and click the link Change/Move to bring up the Change window.
When rooms are changed with this feature, any prior changes to room prices will be retained. If new dates are being added, the system will pull rates from the associated Rate Plan. Additionally, emails in queue will automatically update to reflect any new arrival dates.
For a look at how this feature works, click here to watch our video tutorial of the Move/Change link.
This window contains several useful features.
1. Move Rooms
Simply select the new room to move this guest to. After selecting the room, the system will automatically check to see if the newly selected room is available. If not, as seen in the Lodge Room to Beatrice move in the above example, the system will show a warning, but give options for overriding the warning. The options are to Swap or Overwrite. Swapping the rooms will put the existing reservation in the old room, and the current reservation in the newly selected room. Overwriting will replace the existing reservation with the current reservation.
2. Change the Arrival Date and Number of Nights
Select a new arrival date by clicking in the Arrive box. Add or remove reserved nights by adjusting the number of nights drop down. Note, it is not possible to adjust the number of nights for non-consecutive stays. The entire non-consecutive stay block will be moved to the new arrival date. To change the number of nights, click the Use Calendar link.
3. Remove Room(s)
When a reservation contains more than one room, checkboxes appear to the left side of the window. Check the rooms to be removed, and then click the Remove button.
4. Break Out Room(s)
For multiple room reservations, it is possible to select which room(s) should be taken out of the existing reservation and used to create a new reservation. This is very useful for making new reservations out of a block of rooms being held for a group, such as for a wedding. Simply select the room(s) which will form the new reservation, and click the button Break Into New Reservation.
It is also possible to change rooms from the Availability calendar. Hover over a reservation and click the link Change/Move to bring up the Change window.
When rooms are changed with this feature, any prior changes to room prices will be retained. If new dates are being added, the system will pull rates from the associated Rate Plan. Additionally, emails in queue will automatically update to reflect any new arrival dates.
For a look at how this feature works, click here to watch our video tutorial of the Move/Change link.
Friday, October 19, 2012
Updates to Payments by Date Report
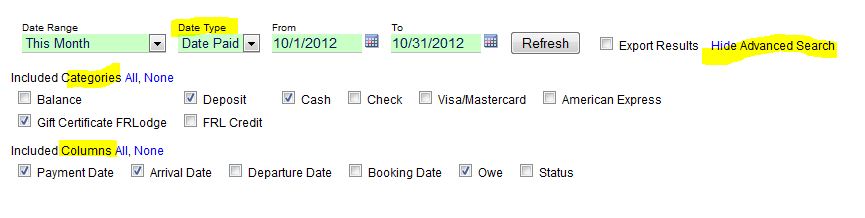
We've added a few new options to the Payments By Date Report.
You can now select which type of date on which to run the query. Select from Payment Date, Arrival Date, Departure Date, and Booking Date.
New options are available by clicking the "Show Advanced Search" link. Now it is possible to select which payment categories to include, and which columns to include in the report. Note, all columns will still appear in the export file, regardless of what has been selected.
Wednesday, October 10, 2012
More Options in Email Templates
We have added two new enhancement to the email templates section (under Website Tab).
First, is the option to upload images which can be used in the templates, such as a logo, or photo.
The other new feature is the ability to set default To, CC, and BCC email addresses. These are the addresses that will be used internally, when the email template is used in the Correspondence window. This is useful for templates that often get sent to people other than the guest, such as to a housekeeper.

When the template is loaded in the correspondence window, the default emails will automatically fill in.

First, is the option to upload images which can be used in the templates, such as a logo, or photo.
The other new feature is the ability to set default To, CC, and BCC email addresses. These are the addresses that will be used internally, when the email template is used in the Correspondence window. This is useful for templates that often get sent to people other than the guest, such as to a housekeeper.
When the template is loaded in the correspondence window, the default emails will automatically fill in.
Monday, October 8, 2012
Rate Adjustment Specials Now Show on Hotel Style Pages
When a rate adjustment results in a price decrease, we now show that information on hotel style pages. Previously this was only implemented on Multiple Unit pages.
Such as is seen here:
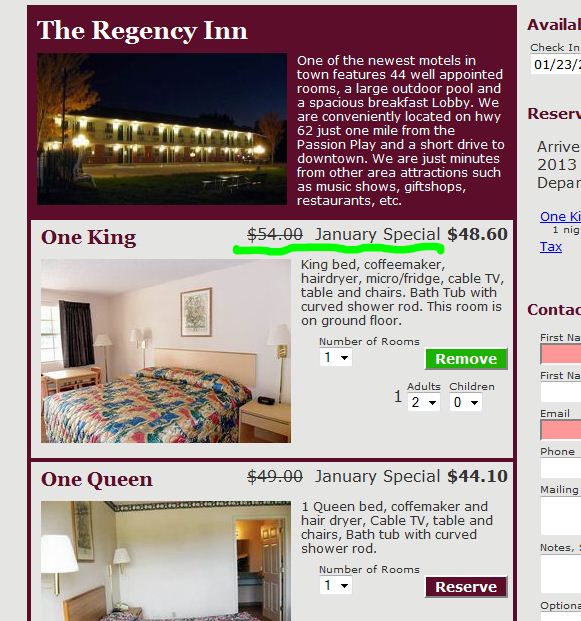
Such as is seen here:
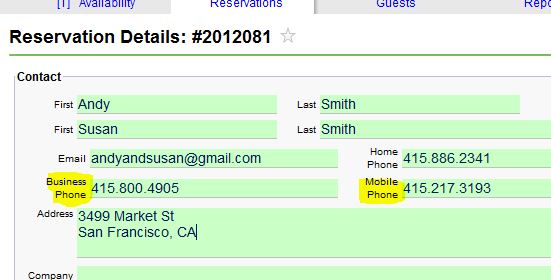
Two New Email Template Codes
We just realized we have only had a code for guest phone, {{guestphone}}, which pulls from the first phone field. But we don't have codes for the two other phone fields, business and mobile phones, two fields that appear on the internal reservation form.
So, now we have added these two code, which can be used in email templates. The codes are:
{{guestbusinessphone}}
{{guestmobilephone}}
Use them like this:
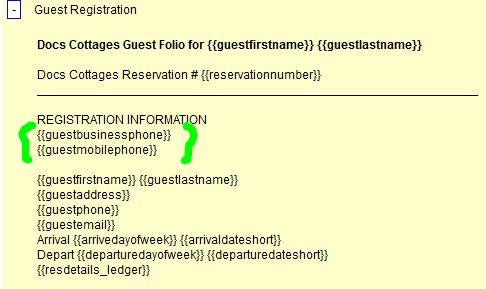
They correspond to these fields in the Reservation Details screen:
So, now we have added these two code, which can be used in email templates. The codes are:
{{guestbusinessphone}}
{{guestmobilephone}}
Use them like this:
They correspond to these fields in the Reservation Details screen:
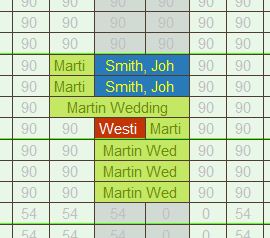
New Feature for Holding Rooms for Groups
Do you ever want to hold a number of rooms for a group booking, such as for a wedding, but you want guests to be able to reserve individual rooms out of those held rooms? Now, this is possible, thanks to a new status option.
In this example, we can see that there are a block of rooms saved for the Martin Wedding (light green), and that two guests for that wedding have made reservations out of that block (Smith, Westin).
The first step is to go to Reservation Status, under the Settings Tab, and set up a new status to be used for Group Holds.
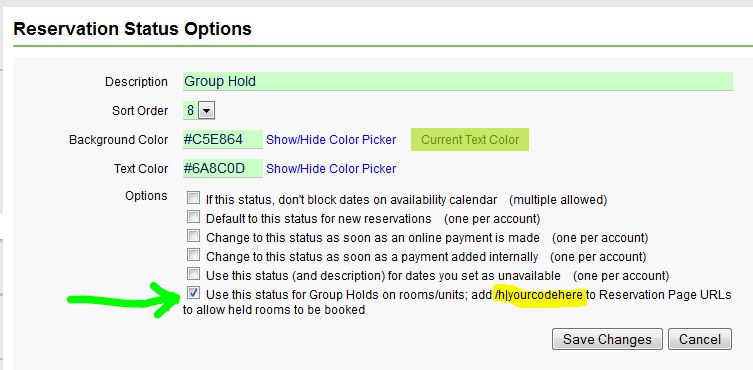
Next, block out the rooms for the group by clicking all the dates and and rooms to be held on your internal calendar, click Add Reservation, and change the status to your new Group Hold status.

Finally, give your wedding group a special link that they can use to make their reservations. To do this, add "/h|ANYCODEHERE" to the end of any reservation page URL. When this code is added, the rooms that are held will appear as available. To everyone going to your normal reservation page URL (without the code), the rooms will appear as unavailable. Such as, https://v2.reservationkey.com/411/MainPage/c/h|martinwedding . When a code is used, the notification email informing you of a new reservation will contain a line showing which code was used. You also could embed the special page in an iframe on your website which uses the special code, such as something like http://www.besthotel.com/weddings.htm . Or you could use a service like http://bit.ly to shorten the special code link to a more manageable URL, such as http://bit.ly/WIq5Ba.
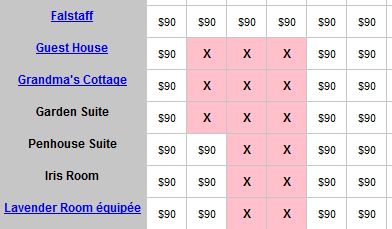
For example, WITHOUT the code, the rooms show blocked:
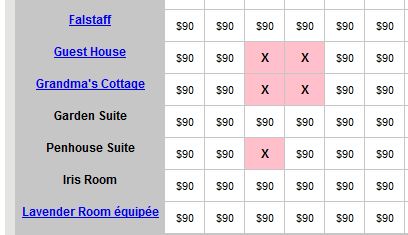
WITH the code, the rooms show as available (rooms that show as unavailable are the confirmed rooms booked by other guests in the group):
In this example, we can see that there are a block of rooms saved for the Martin Wedding (light green), and that two guests for that wedding have made reservations out of that block (Smith, Westin).
The first step is to go to Reservation Status, under the Settings Tab, and set up a new status to be used for Group Holds.
Next, block out the rooms for the group by clicking all the dates and and rooms to be held on your internal calendar, click Add Reservation, and change the status to your new Group Hold status.
Finally, give your wedding group a special link that they can use to make their reservations. To do this, add "/h|ANYCODEHERE" to the end of any reservation page URL. When this code is added, the rooms that are held will appear as available. To everyone going to your normal reservation page URL (without the code), the rooms will appear as unavailable. Such as, https://v2.reservationkey.com/411/MainPage/c/h|martinwedding . When a code is used, the notification email informing you of a new reservation will contain a line showing which code was used. You also could embed the special page in an iframe on your website which uses the special code, such as something like http://www.besthotel.com/weddings.htm . Or you could use a service like http://bit.ly to shorten the special code link to a more manageable URL, such as http://bit.ly/WIq5Ba.
For example, WITHOUT the code, the rooms show blocked:
WITH the code, the rooms show as available (rooms that show as unavailable are the confirmed rooms booked by other guests in the group):
Sunday, October 7, 2012
Using the Search Form and Iframes
If you want to use a "book now" form where guests enter their dates on your website you have to pass the variables
to YOUR page which then passes them to the URL in the iframe. This can
be done using programming, such as PHP, ASP, etc, or with javascript. Here is a way to do this in javascript so that you don't have to write any code.
There are three things you need to do:
1. Put this javascript in the HEAD section for the page that contains the iframe:
<script lang="javascript" type="text/javascript">
var qrStr = window.location.search;
var spQrStr = qrStr.substring(1);
var arrQrStr = new Array();
// splits each of pair
var arr = spQrStr.split('&');
for (var i=0;i<arr.length;i++){
// splits each of field-value pair
var index = arr[i].indexOf('=');
var key = arr[i].substring(0,index);
var val = arr[i].substring(index+1);
// saves each of field-value pair in an array variable
arrQrStr[key] = val; }
var arrive=arrQrStr["a"];
var depart=arrQrStr["d"];
var numguests=arrQrStr["g"];
</script>
2. Modify the search box code
The first line should be changed like this (put url of your page with the iframe):
<input type=hidden name=respage id=respage value="http://www.
The book now button line should be like this:
<input type=button value="Book Now" onclick="window.location=
If you will be taking credit cards on your reservation page, you will need to consider whether or not you might want your own SSL certificate. A complete discussion of these issues is found in this blog post: http://reservationkey.blogspot.com/2012/02/do-you-need-your-own-ssl-certificate.html
There are three things you need to do:
1. Put this javascript in the HEAD section for the page that contains the iframe:
<script lang="javascript" type="text/javascript">
var qrStr = window.location.search;
var spQrStr = qrStr.substring(1);
var arrQrStr = new Array();
// splits each of pair
var arr = spQrStr.split('&');
for (var i=0;i<arr.length;i++){
// splits each of field-value pair
var index = arr[i].indexOf('=');
var key = arr[i].substring(0,index);
var val = arr[i].substring(index+1);
// saves each of field-value pair in an array variable
arrQrStr[key] = val; }
var arrive=arrQrStr["a"];
var depart=arrQrStr["d"];
var numguests=arrQrStr["g"];
</script>
2. Modify the search box code
The first line should be changed like this (put url of your page with the iframe):
<input type=hidden name=respage id=respage value="http://www.
The book now button line should be like this:
<input type=button value="Book Now" onclick="window.location=
3. Replace the iframe code with this:
<script lang="javascript" type="text/javascript">
var reservationpageurl="http://v2.
if (arrive) {
document.write("<IFRAME SRC='"+reservationpageurl+"s|"
} else {
document.write("<IFRAME SRC='"+reservationpageurl+"' name='publicpage' width=100% height=1600px frameborder=0></IFRAME>");
}
</script>
<script lang="javascript" type="text/javascript">
var reservationpageurl="http://v2.
if (arrive) {
document.write("<IFRAME SRC='"+reservationpageurl+"s|"
} else {
document.write("<IFRAME SRC='"+reservationpageurl+"' name='publicpage' width=100% height=1600px frameborder=0></IFRAME>");
}
</script>
If you will be taking credit cards on your reservation page, you will need to consider whether or not you might want your own SSL certificate. A complete discussion of these issues is found in this blog post: http://reservationkey.blogspot.com/2012/02/do-you-need-your-own-ssl-certificate.html
Friday, October 5, 2012
All About PayPal Subscriptions For ReservationKey Service
We sometimes are asked why we only take PayPal for subscriptions to ReservationKey. The primary reason is because it is easy for us and is generally easy for our users. For us, we are able to keep our costs low by not having to spend any additional resources handling billing. With PayPal subscriptions, all of our payments are completely automated, whether our users pay by the month or by the year. Although we do pay PayPal 2.5% plus 30 cents per transaction, we feel this is a reasonable expense considering how big of time savings we have with PayPal subscriptions. If we didn't automate our subscription process, we would have to track when payments are owed, send reminders to people whose accounts are not current, all of which would take resources away from doing what we love to do, which is continuing to develop a better and better product.
For our users, paying with PayPal is generally very easy. The initial set up of the subscription is quick, as users are redirected to PayPal to set up the subscription. There they can sign in to PayPal to create the initial subscription, or if they don't yet have a PayPal account, they can easily set one up, and fund the new account with a credit card. Once the initial subscription is created, our users never have to worry about remembering to make their payment since payments happen automatically once a month (or year, depending on subscription type). And users can cancel their subscription at any time by logging into their PayPal account.
The only slight issue we have run into is when user's credit cards used as their PayPal funding source expire and their payment does not go through automatically. A few months ago we instituted a 15 day grace period in which users can update their credit card details in PayPal. As long as the funding source in PayPal is updated within this 15 day period there will be no interruption in ReservationKey service. Our users receive a warning that their payment did not go through, when this happens, when they log into ReservationKey.
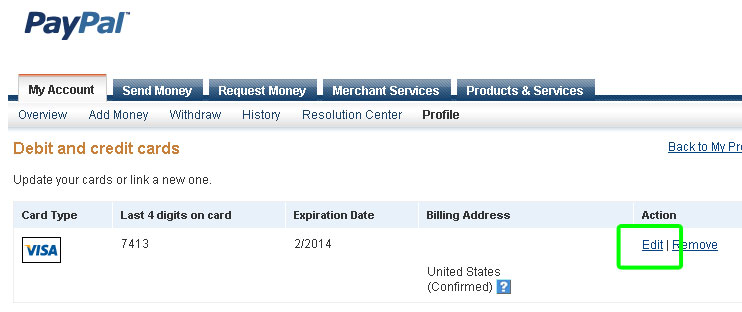
Updating an existing credit card in PayPal is easy. Simply log into PayPal at www.paypal.com.
Then, on the top navigation bar, select Profile, Update Card.
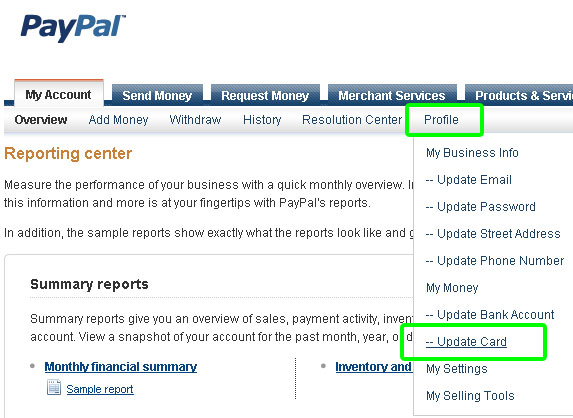
On the next screen, click Edit.
Then, scroll down and update the expiration date and click Save.
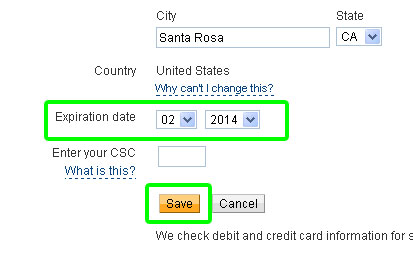
This is all there is to it.
For our users, paying with PayPal is generally very easy. The initial set up of the subscription is quick, as users are redirected to PayPal to set up the subscription. There they can sign in to PayPal to create the initial subscription, or if they don't yet have a PayPal account, they can easily set one up, and fund the new account with a credit card. Once the initial subscription is created, our users never have to worry about remembering to make their payment since payments happen automatically once a month (or year, depending on subscription type). And users can cancel their subscription at any time by logging into their PayPal account.
The only slight issue we have run into is when user's credit cards used as their PayPal funding source expire and their payment does not go through automatically. A few months ago we instituted a 15 day grace period in which users can update their credit card details in PayPal. As long as the funding source in PayPal is updated within this 15 day period there will be no interruption in ReservationKey service. Our users receive a warning that their payment did not go through, when this happens, when they log into ReservationKey.
Updating an existing credit card in PayPal is easy. Simply log into PayPal at www.paypal.com.
Then, on the top navigation bar, select Profile, Update Card.
On the next screen, click Edit.
Then, scroll down and update the expiration date and click Save.
This is all there is to it.
Thursday, October 4, 2012
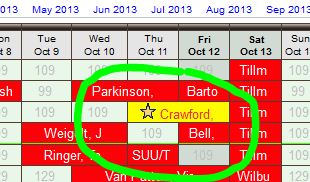
Highlight Reservations By Adding a Star
Now it is possible to "star" reservations in order to highlight certain ones. When a star has been added, the star will appear next to the guest's name on the internal reservation calendar.
To add a star, simply click the star at the top of the Reservation Details screen.
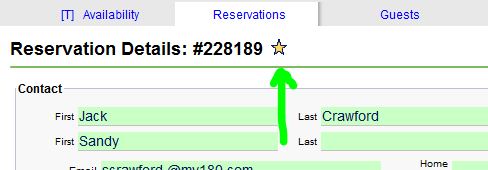
We think there is room for expansion of this feature, and likely will be adding to it over time. Some suggestions we have already received include ability to set symbols other than a star, filter by starred reservations, and automatically star reservations that have items for sale attached. If you have any additional suggestions, feel free to pass them along.
To add a star, simply click the star at the top of the Reservation Details screen.
We think there is room for expansion of this feature, and likely will be adding to it over time. Some suggestions we have already received include ability to set symbols other than a star, filter by starred reservations, and automatically star reservations that have items for sale attached. If you have any additional suggestions, feel free to pass them along.
Tuesday, October 2, 2012
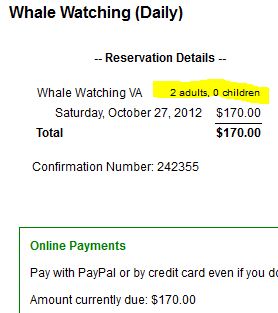
A Few CSS Tweaks
We've added a couple of new tweaks for hiding the number of children in the reservation forms.
By adding these lines to a custom theme, the number of children can be hidden.
Hide the number of children dropdown:
.numchildren { display:none; }
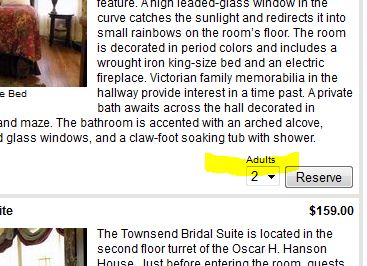
Hide the number of children in the reservation summary, on the Reservation Page:
#numguests_children_span {display:none;}
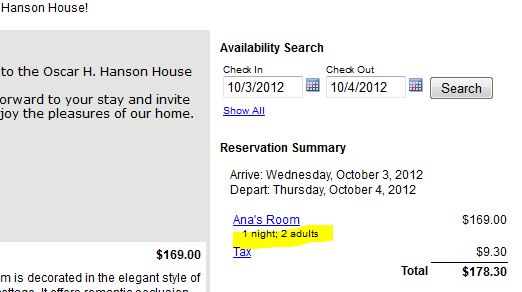
Hide the number of children in the final confirmation page:
#ledger_numchildren {display:none;}
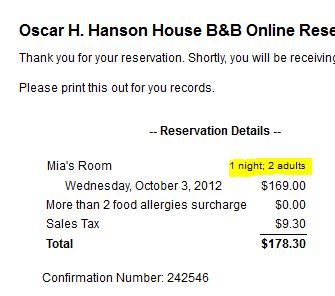
And, one other tweak, in case you don't want to display number of nights in the final confirmation page, it can be hidden like this:
#ledger_numnights {display:none;}
By adding these lines to a custom theme, the number of children can be hidden.
Hide the number of children dropdown:
.numchildren { display:none; }
Hide the number of children in the reservation summary, on the Reservation Page:
#numguests_children_span {display:none;}
Hide the number of children in the final confirmation page:
#ledger_numchildren {display:none;}
And, one other tweak, in case you don't want to display number of nights in the final confirmation page, it can be hidden like this:
#ledger_numnights {display:none;}
Subscribe to:
Comments (Atom)